[Angular | nx.dev] Adding NGRX - State Management
![[Angular | nx.dev] Adding NGRX - State Management](https://images.unsplash.com/photo-1494961104209-3c223057bd26?crop=entropy&cs=tinysrgb&fit=max&fm=jpg&ixid=MnwxMTc3M3wwfDF8c2VhcmNofDJ8fGNvbnRhaW5lcnxlbnwwfHx8fDE2NDg5ODcyMzI&ixlib=rb-1.2.1&q=80&w=1460)
Recently I uploaded a post about creating a single project workspace structure using nx.dev and angular. Now it's time to add ngrx to our newly created project. I will continue with the project structure from the previous post.
 Georg Höller
Setup
Installing ngrx
npm install @ngrx/store
npm install @ngrx/component-store
npm install @ngrx/effects
npm install @ngrx/entity
npm install @ngrx/router-store

npm install @ngrx/schematics --save-dev
npm install @ngrx/store-devtools --save-devPrepare Your Workspace
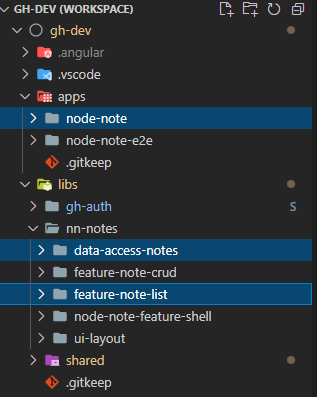
First, we have to add the root level store. This will grow with each feature, by adding feature level states.
In my case I will add the root level store to the node-note application and a feature level state to the data-access-notes library. After that, we will use the store in the feature-note-list to add and display notes.
Root Level Store
Start by creating the root level store with the following command. Make sure to add the correct path to your root module.
nx g ngrx app --module=apps/node-note/src/app/app.module.ts --rootYou will see some changes in the import section of your app module. That is the basic initialization for ngrx store and effects. It should be good as it is for now.
Feature Level Store
Now add the feature level store to the data-access-notes library. It's common practice to place your state-relevant code in a folder called '+state'. With the plus as a prefix, it should be always on top of your file tree.
nx g ngrx notes --module=libs/nn-notes/data-access-notes/src/lib/data-access-notes.module.ts --directory +state/notes
-- Is this the root state of the application? (y/N) · false
-- Would you like to use a Facade with your NgRx state? (y/N) · true
This command will create all necessary files and add some basic functionality. In addition to that, it updates the library module with the initialization code we already know from the root level store. But instead of forRoot it calls forFeature.
The store preparations should be done. Let's see how the store works!
Using The Store
For this tutorial, our goal is to be able to create and read notes. In addition to this, we should get an error state if a note with the same id is already in the notes array.
We will use the note-overview component we created in the previous tutorial.

Add a note
Add some basic HTML to be able to create a new note.
<h1>Notes List</h1>
<div>
  <div>ID:</div>
  <input #noteId type="number" />
  <div>Text:</div>
  <input #noteText />
</div>
<button (click)="add(noteId.value, noteText.value)">Add</button>add(id: string, text: string) {
}Now we have to add some logic to our state that we can add notes. In the feature store command, we checked the facade option. So we have to use the generated facade file to add the note because it should be the only file that gets referenced.
Actions:
Create a new action definition for adding notes. The string parameter defines the internal name, the second parameter defines input parameters.
export const addNote = createAction(
  '[Notes/API] Add Note',
  props<{ note: NotesEntity }>()
);
Reducers:
Reducers are responsible for updating the state. Add the following code to add the new note to the state.
on(NotesActions.addNote, (state, { note }) =>
  notesAdapter.addOne(note, { ...state })
),Facade:
Finally, dispatch the action with a new function in the facade.
addNode(note: NotesEntity) {
  this.store.dispatch(NotesActions.addNote({ note }));
}Now call the facade function inside your recently added add function.
constructor(private notesFacade: NotesFacade) {}

add(id: string, text: string) {
    this.notesFacade.addNode({
      id: id,
      text: text,
    });
}Display a Note
To display the added note we will use the auto-generated allNotes observable inside the facade. But first, we should take a look at what is happening in the selector.
Selector:
The code is quite simple:
export const getNotesState = createFeatureSelector<State>(NOTES_FEATURE_KEY);

const { selectAll, selectEntities } = notesAdapter.getSelectors();

export const getAllNotes = createSelector(getNotesState, (state: State) =>
  selectAll(state)
);
The predefined function selectAll does the job for us, returning the entire array of notes.
Switching back to our note list, let's add the following HTML to display the notes.
<table>
  <tr>
    <th>ID</th>
    <th>Text</th>
  </tr>
  <tr *ngFor="let node of notesList$ | async">
    <td>{{ node.id }}</td>
    <td>{{ node.text }}</td>
  </tr>
</table>Now we only have to add the local variable notesList$ and assign allNotes$.
notesList$: Observable<NotesEntity[]> = this.notesFacade.allNotes$;Great, the added notes should now appear!
Error Handling
You may recognize that nothing happens when you add the same Id multiple times.
Effects:
Effects should call your service logic. When we add a note, this is the place to call the backend and, for example, add it to the database. We don't use a backend for this tutorial but we will use an effect to add error handling.
First, add two more actions:
export const addNoteSuccess = createAction(
  '[Notes/API] Add Note Success',
  props<{ note: NotesEntity }>()
);

export const addNoteFailure = createAction(
  '[Notes/API] Add Note Failure',
  props<{ error: Error }>()
);
Add a new effect:
addNote$ = createEffect(() =>
  this.actions$.pipe(
    // define action
    ofType(NotesActions.addNote),
    // load previous notes
    withLatestFrom(this.store$.select(NotesSelectors.getAllNotes)),
    concatMap(([action, latestAllNotes]) => {
      // dummy observable to catch error
      return of(null).pipe(
        concatMap(() => {
          // validation
          if (latestAllNotes
          	  && latestAllNotes.find((n) => n.id == action.note.id))
            return throwError(() => new Error('Duplicate ID'));

          return of(NotesActions.addNoteSuccess(action));
        }),
        catchError((error) => {
          return of(NotesActions.addNoteFailure({ error }));
        })
      );
    })
  )
);Basically, we use an effect for the validation and call different actions for each outcome.
Now we have to make some modifications to the reducer. Change the action on your recently created reducer and add the error reducer:
on(NotesActions.addNoteSuccess, (state, { note }) =>
  notesAdapter.addOne(note, { ...state })
),
on(NotesActions.addNoteFailure, (state, { error }) => {
  return { ...state, error: error.message };
})The selector for the error should already exist:
export const getNotesError = createSelector(
  getNotesState,
  (state: State) => state.error
);Now we can finally display the error in our HTML:
<div *ngIf="notesError$ | async; let err" style="color: red">
  Error: {{ err }}
</div>
Don't forget to define the observable variable in the typescript file:
notesError$: Observable<string | null | undefined> =
this.notesFacade.notesError$;Source Code:
 Georg632

Georg Hoeller Newsletter
Join the newsletter to receive the latest updates in your inbox.
![[Angular | Storybook] Tailwind, Directives, Content Projection, Icons and i18n](https://images.unsplash.com/photo-1508780709619-79562169bc64?crop=entropy&cs=tinysrgb&fit=max&fm=webp&ixid=M3wxMTc3M3wwfDF8c2VhcmNofDE4fHxtYWN8ZW58MHx8fHwxNjk0NDU4OTkyfDA&ixlib=rb-4.0.3&q=80&w=1460)
![[Angular | RxJS] BehaviorSubject with custom states](https://images.unsplash.com/photo-1504805572947-34fad45aed93?crop=entropy&cs=tinysrgb&fit=max&fm=webp&ixid=MnwxMTc3M3wwfDF8c2VhcmNofDE0fHxzdGF0ZSUyMGNoYW5nZXxlbnwwfHx8fDE2ODE1NTQ4NTg&ixlib=rb-4.0.3&q=80&w=1460)
![[Angular] Dynamic App Config and Translations in a Submodule](https://images.unsplash.com/photo-1484807352052-23338990c6c6?crop=entropy&cs=tinysrgb&fit=max&fm=webp&ixid=MnwxMTc3M3wwfDF8c2VhcmNofDN8fG1hY2Jvb2t8ZW58MHx8fHwxNjc2MTg4MzE5&ixlib=rb-4.0.3&q=80&w=1460)