[Angular | nx.dev] Single Project Workspace Structure
![[Angular | nx.dev] Single Project Workspace Structure](https://images.unsplash.com/photo-1593062096033-9a26b09da705?crop=entropy&cs=tinysrgb&fit=max&fm=jpg&ixid=MnwxMTc3M3wwfDF8c2VhcmNofDZ8fHdvcmtzcGFjZXxlbnwwfHx8fDE2NDYxNjY2NDk&ixlib=rb-1.2.1&q=80&w=1460)
The concept of a monorepo is great but not always doable because of all sorts of circumstances. For me the critical point always is git - I want each project to have its own repository!
But this doesn't mean you can't use a monorepo framework for a single project. We even can reuse libraries for the sake of the DRY principle. I will explain this further in a separate post.
 Georg Höller
In this tutorial, I will show you my single project workspace structure and the CLI commands to create them. Afterward, we going to add the needed routing that everything is working together as expected. Let's dive into it!
Setup
Workspace
The workspace creation will take some time so we will do this before looking at the structure:
npx create-nx-workspace@latestSelect the Angular preset and choose a name for the workspace and your first app.
I will continue with the workspace gh-dev and the app node-note.
Folder Structure
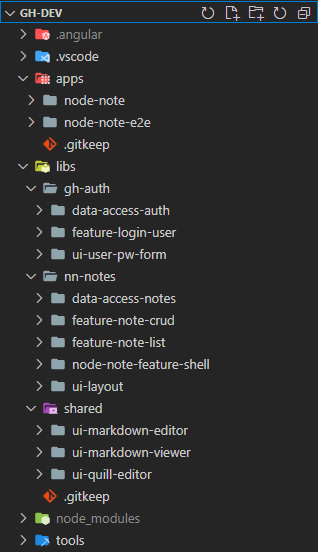
This part gave me some headaches but I think I found a long-lasting structure for a single project workspace:
-
gh-auth (grouping folder)
- data-access-auth
contains the ngrx state for user entity and handles api communication - feature-login-user
business logic for user login - ui-user-pw-form
contains dumb login form component
- data-access-auth
-
nn-notes (grouping folder)
- data-access-notes
contains the ngrx state for notes entity and handles api communication - feature-note-crud
business logic for CRUD operations - feature-note-list
business logic for displaying notes in a list - node-note-feature-shell
starting point - handles routing for our application - ui-layout
contains our basic layout
- data-access-notes
-
shared (grouping folder)
- ui-markdown-editor
basic ui for a markdown editor - ui-markdown-viewer
basic ui for a markdown viewer - ui-quill-editor
basic ui for a quill editor
- ui-markdown-editor
Now let's create the main area of the app together. The grouping folders gh-auth and shared are not part of this tutorial. I think you will get it fast enough to create them on your own ;-).
Using the nx CLI to create the nn-notes libraries: (append --dry-run for testing)
nx g lib data-access-notes --directory=nn-notes --simpleModuleName=true
nx g lib feature-note-list --directory=nn-notes --simpleModuleName=true
nx g lib feature-note-crud --directory=nn-notes --simpleModuleName=true
nx g lib ui-layout --directory=nn-notes --simpleModuleName=true
App Routing
To be able to run our application I added some basic routing - let's begin with the main app:
<router-outlet></router-outlet>@NgModule({
declarations: [AppComponent],
imports: [
BrowserModule,
NodeNoteFeatureShellModule, //added this line
],
providers: [],
bootstrap: [AppComponent],
})
export class AppModule {}Now I updated the Feature Shell Module which I imported in the previous step:
const routes: Routes = [
  {
    path: '',
    component: BaseLayoutComponent,
    children: [
      {
        path: 'notelist',
        loadChildren: () =>
          import('@gh-dev/nn-notes/feature-note-list').then(
            (m) => m.FeatureNoteListModule
          ),
      },
      { path: '**', redirectTo: 'notelist' },
    ],
  },
];

@NgModule({
  imports: [CommonModule, UiLayoutModule, RouterModule.forRoot(routes)],
  declarations: [],
  exports: [],
})
export class NodeNoteFeatureShellModule {}The route notelist is loaded with lazy loading. It is defined as child-route because I want to use a component as a base layout.
Let's add the layout component to the previously created ui-layout library - using the following command:
nx g c base-layout --project=nn-notes-ui-layoutAdd any HTML to display the base-layout around the main content which is displayed with the router-outlet tag:
<div style="margin-bottom: 1em">---base layout start---</div>
<router-outlet></router-outlet>
<div style="margin-top: 1em">---base layout end---</div>Don't forget to import RouterModule in the ui-layout.module.ts
Feature Routing
For the last step, we need to add the routing to the feature library. Let's start with the final component which should be accessible under '/notelist'.
nx g c components/note-overview --project=nn-notes-feature-note-listAfterwards, add some basic routing to the library module to display the created component:
const routes: Routes = [
  {
    path: '',
    component: NoteOverviewComponent,
  },
  {
    path: '**',
    redirectTo: '',
  },
];

@NgModule({
  imports: [
    CommonModule,
    RouterModule.forChild(routes),
  ],
  declarations: [NoteOverviewComponent],
})
export class FeatureNoteListModule {}
Testing
Run your app with ng s and you should see our fallback routing working - you should be getting redirected to /notelist.
Check your workspace dependencies with the nx.dev dep-graph with the following command. (more information)
nx graph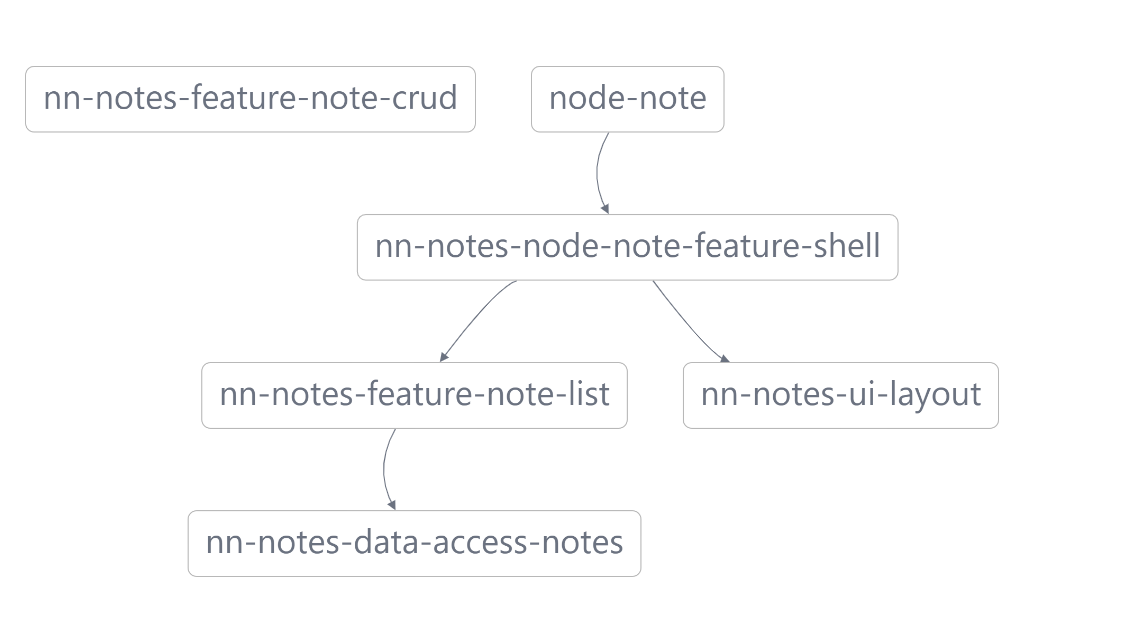
Future
In the upcoming blog post, we will add the state management framework ngrx.io to our project. When we have understood how ngrx works we will use it in our feature-note-crud library to add notes and display them in our created note-list.


Georg Hoeller Newsletter
Join the newsletter to receive the latest updates in your inbox.
![[Angular | Storybook] Tailwind, Directives, Content Projection, Icons and i18n](https://images.unsplash.com/photo-1508780709619-79562169bc64?crop=entropy&cs=tinysrgb&fit=max&fm=webp&ixid=M3wxMTc3M3wwfDF8c2VhcmNofDE4fHxtYWN8ZW58MHx8fHwxNjk0NDU4OTkyfDA&ixlib=rb-4.0.3&q=80&w=1460)
![[Angular | RxJS] BehaviorSubject with custom states](https://images.unsplash.com/photo-1504805572947-34fad45aed93?crop=entropy&cs=tinysrgb&fit=max&fm=webp&ixid=MnwxMTc3M3wwfDF8c2VhcmNofDE0fHxzdGF0ZSUyMGNoYW5nZXxlbnwwfHx8fDE2ODE1NTQ4NTg&ixlib=rb-4.0.3&q=80&w=1460)
![[Angular] Dynamic App Config and Translations in a Submodule](https://images.unsplash.com/photo-1484807352052-23338990c6c6?crop=entropy&cs=tinysrgb&fit=max&fm=webp&ixid=MnwxMTc3M3wwfDF8c2VhcmNofDN8fG1hY2Jvb2t8ZW58MHx8fHwxNjc2MTg4MzE5&ixlib=rb-4.0.3&q=80&w=1460)